Use this guide and follow the sequential steps to build your Testnet Akash Provider with GPU support.
- Prepare Kubernetes Hosts
- Disable Search Domains
- Install NVIDIA Drivers & Toolkit
- NVIDIA Runtime Configuration
- Create Kubernetes Cluster
- Confirm Kubernetes Cluster
- Helm Installation on Kubernetes Node
- Apply NVIDIA Runtime Engine
- Test GPUs
- Akash Provider Install
- Ingress Controller Install
- Domain Name Review
- GPU Test Deployments
Prepare Kubernetes Hosts
Akash Providers utilize an underlying Kubernetes cluster. Begin your Akash Provider build by preparing the hosts that the Kubernetes cluster will be built on.
Follow the instructions in this guide to prepare the hosts. Complete steps 1-6 in the linked guide and then return to proceed with the steps of this Provider Build with GPU guide.
Disable Search Domains
Overview
In this section we perform the following DNS adjustments:
Set Use Domains to False
- Set
use-domains: falseto prevent the possibility of systemd’s DHCP client overwriting the DNS search domain. This prevents a potentially bad domain served by the DHCP server from becoming active. - This is a common issue to some of the providers which is explained in more detail here
Set Accept RA to False
- Set
accept-ra: falseto disable IPv6 Router Advertisement (RA) as the DNS search domain may still leak through if not disabled. - Potential issue this addresses is explained in more detail here
Create Netplan
NOTE - the DNS resolution issue & the Netplan fix addressed in this step are described here
Apply the following to all Kubernetes control plane and worker nodes.
IMPORTANT - Make sure you do not have any other config files under the
/etc/netplandirectory, otherwise it could cause unexpected networking issues / issues with booting up your node.
If you aren’t using the DHCP or want to add additional configuration, please refer to the netplan documentation here for additional config options.
Example
- File:
/etc/netplan/01-netcfg.yaml
Note that this is only an example of the netplan configuration file to show you how to disable the DNS search domain overriding and IPv6 Router Advertisement (RA). Do not blindly copy the entire config but rather use it as a reference for your convenience!
network: version: 2 renderer: networkd ethernets: all: match: name: en* dhcp4: yes dhcp4-overrides: use-domains: false # disable accept-ra, otherwise it will bring search domains to your /etc/resolv.conf # refs https://bugs.launchpad.net/netplan/+bug/1858503 accept-ra: false optional: trueTest and Apply Netplan
Test the Netplan config and apply via these commands.
resolvectl domainnetplan trynetplan applyresolvectl domainExpected/Example Output
root@ip-172-31-18-188:~# resolvectl domainGlobal:Link 2 (eth0): us-east-2.compute.internalroot@ip-172-31-18-188:~# netplan tryDo you want to keep these settings?

Press ENTER before the timeout to accept the new configuration

Changes will revert in 111 secondsConfiguration accepted.root@ip-172-31-18-188:~# netplan applyroot@ip-172-31-18-188:~# resolvectl domainGlobal:Link 2 (eth0): us-east-2.compute.internal
Install NVIDIA Drivers & Toolkit
NOTE - The steps in this section should be completed on all Kubernetes nodes hosting GPU resources
Prepare Environment
NOTE - reboot the servers following the completion of this step
apt update
DEBIAN_FRONTEND=noninteractive apt -y -o Dpkg::Options::="--force-confdef" -o Dpkg::Options::="--force-confold" dist-upgrade
apt autoremove
Install Latest NVIDIA Drivers
The ubuntu-drivers devices command detects your GPU and determines which version of the NVIDIA drivers is best.
NOTE - the NVIDIA drivers detailed and installed in this section have known compatibility issues with some
6.XLinux kernels as discussed here. In our experience, when such compatibility issue occur the driver will install with no errors generated but will not functionality properly. If you encounter Linux kernel and NVIDIA driver compatibility issues, consider downgrading the Kernel to the officially supported Ubuntu 22.04 kernel which at the time of this writing is5.15.0-73
apt install ubuntu-drivers-common
ubuntu-drivers devices
Expected/Example Output
root@node1:~# ubuntu-drivers devices
== /sys/devices/pci0000:00/0000:00:1e.0 ==modalias : pci:v000010DEd00001EB8sv000010DEsd000012A2bc03sc02i00vendor   : NVIDIA Corporationmodel    : TU104GL [Tesla T4]driver   : nvidia-driver-450-server - distro non-freedriver   : nvidia-driver-418-server - distro non-freedriver   : nvidia-driver-470-server - distro non-freedriver   : nvidia-driver-515 - distro non-freedriver   : nvidia-driver-510 - distro non-freedriver   : nvidia-driver-525-server - distro non-freedriver   : nvidia-driver-525 - distro non-free recommendeddriver   : nvidia-driver-515-server - distro non-freedriver   : nvidia-driver-470 - distro non-freedriver   : xserver-xorg-video-nouveau - distro free builtin
Driver Install Based on Output
Run either ubuntu-drivers autoinstall or apt install nvidia-driver-525 (driver names may be different in your environment).
The autoinnstall option installs the recommended version and is appropriate in most instances.
The apt install <driver-name>alternatively allows the install of preferred driver instead of the recommended version.
ubuntu-drivers autoinstallInstall the NVIDIA Container Toolkit
curl -s -L https://nvidia.github.io/libnvidia-container/gpgkey | apt-key add -curl -s -L https://nvidia.github.io/libnvidia-container/stable/deb/nvidia-container-toolkit.list | tee /etc/apt/sources.list.d/libnvidia-container.list
apt-get updateapt-get install -y nvidia-container-toolkit nvidia-container-runtime
Additional References for Node Configurations
NOTE - references are for additional info only. No actions are necessary and the Kubernetes nodes should be all set to proceed to next step based on configurations enacted in prior steps on this doc.
- https://github.com/NVIDIA/k8s-device-plugin#prerequisites
- https://docs.nvidia.com/datacenter/cloud-native/container-toolkit/install-guide.html
NVIDIA Runtime Configuration
Worker nodes
IMPORTANT - This should be done on all worker nodes that have GPU installed!
Update the nvidia-container-runtime config in order to prevent NVIDIA_VISIBLE_DEVICES=all abuse where tenants could access more GPU’s than they requested.
NOTE - This will only work with
nvdp/nvidia-device-pluginhelm chart installed with--set deviceListStrategy=volume-mounts(you’ll get there in the next steps)
Make sure the config file /etc/nvidia-container-runtime/config.toml contains these line uncommmented and set to these values:
accept-nvidia-visible-devices-as-volume-mounts = trueaccept-nvidia-visible-devices-envvar-when-unprivileged = falseNOTE -
/etc/nvidia-container-runtime/config.tomlis part ofnvidia-container-toolkit-basepackage; so it won’t override the customer-set parameters there since it is part of the/var/lib/dpkg/info/nvidia-container-toolkit-base.conffiles
Kubespray
NOTE - This step should be completed on the Kubespray host only
In this step we add the NVIDIA runtime confguration into the Kubespray inventory. The runtime will be applied to necessary Kubernetes hosts when Kubespray builds the cluster in the subsequent step.
cat > ~/kubespray/inventory/akash/group_vars/all/akash.yml <<'EOF'containerd_additional_runtimes: - name: nvidia type: "io.containerd.runc.v2" engine: "" root: "" options: BinaryName: '/usr/bin/nvidia-container-runtime'EOFCreate Kubernetes Cluster
Create Cluster
NOTE - This step should be completed from the Kubespray host only
With inventory in place we are ready to build the Kubernetes cluster via Ansible.
NOTE - the cluster creation may take several minutes to complete
- If the Kubespray process fails or is interpreted, run the Ansible playbook again and it will complete any incomplete steps on the subsequent run
cd ~/kubespray
source venv/bin/activate
ansible-playbook -i inventory/akash/hosts.yaml -b -v --private-key=~/.ssh/id_rsa cluster.yml
GPU Node Label (Kubernetes)
Each node that provides GPUs must be labeled correctly.
NOTE - these configurations should be completed on a Kubernetes control plane node
Label Template
- Use this label template in the
kubectl labelcommand in the subsequent Label Appliction sub-section below
NOTE - please do not assign any value other than
trueto these labels. Setting the value tofalsemay have unexpected consequences on the Akash provider. If GPU resources are removed from a node, simply remove the Kubernetes label completely from that node.
akash.network/capabilities.gpu.vendor.<vendor name>.model.<model name>=trueLabel Application
Template
NOTE - if you are unsure of the
<node-name>to be used in this command - issuekubectl get nodesfrom one of your Kubernetes control plane nodes to obtain via theNAMEcolumn of this command output
kubectl label node <node-name> <label>Example
NOTE - issue this command/label application for all nodes hosting GPU resources
kubectl label node node1 akash.network/capabilities.gpu.vendor.nvidia.model.a4000=trueExpected Output using Example
###Apply labelsroot@node1:~/provider# kubectl label node node1 akash.network/capabilities.gpu.vendor.nvidia.model.a4000=truenode/node1 labeled
###Verification of applied labelsroot@node1:~/provider# kubectl describe node node1 | grep -A10 LabelsLabels:             akash.network/capabilities.gpu.vendor.nvidia.model.a4000=true......
Additional Kubernetes Configurations
NOTE - these configurations should be completed on a Kubernetes control plane node
kubectl create ns akash-serviceskubectl label ns akash-services akash.network/name=akash-services akash.network=true
kubectl create ns leasekubectl label ns lease akash.network=true
Confirm Kubernetes Cluster
A couple of quick Kubernetes cluster checks are in order before moving into next steps.
SSH into Kubernetes Master Node
NOTE - the verifications in this section must be completed on a master node with Kubectl access to the cluster.
Confirm Kubernetes Nodes
kubectl get nodesExample output from a healthy Kubernetes cluster
root@node1:~# kubectl get nodes
NAME    STATUS   ROLES           AGE   VERSIONnode1   Ready    control-plane   18m   v1.25.6node2   Ready    <none>          17m   v1.25.6node3   Ready    <none>          17m   v1.25.6
Confirm Kubernetes Pods
kubectl get pods -n kube-systemExample output of the pods that are the brains of the cluster
root@node1:~# kubectl get pods -n kube-system
NAME                                       READY   STATUS    RESTARTS   AGEcalico-kube-controllers-75748cc9fd-vv84p   1/1     Running   0          17mcalico-node-ns4ps                          1/1     Running   0          17mcalico-node-ttwzt                          1/1     Running   0          17mcalico-node-wxlsj                          1/1     Running   0          17mcoredns-588bb58b94-hbk94                   1/1     Running   0          17mcoredns-588bb58b94-vr8j5                   1/1     Running   0          17mdns-autoscaler-5b9959d7fc-g4jmj            1/1     Running   0          17mkube-apiserver-node1                       1/1     Running   1          19mkube-controller-manager-node1              1/1     Running   1          19mkube-proxy-6vs5w                           1/1     Running   0          18mkube-proxy-czqfr                           1/1     Running   0          18mkube-proxy-k52bw                           1/1     Running   0          18mkube-scheduler-node1                       1/1     Running   1          19mnginx-proxy-node2                          1/1     Running   0          17mnginx-proxy-node3                          1/1     Running   0          18mnodelocaldns-75mn2                         1/1     Running   0          17mnodelocaldns-cj6gq                         1/1     Running   0          17mnodelocaldns-tnkmd                         1/1     Running   0          17m
Verify etcd Status and Health
Commands should be run on the control plane node to ensure health of the Kubernetes
etcddatabase
export $(grep -v '^#' /etc/etcd.env | xargs -d '\n')etcdctl -w table member listetcdctl endpoint health --cluster -w tableetcdctl endpoint status --cluster -w tableetcdctl check perfExample/Expected Output of etcd Health Check
root@node1:~# export $(grep -v '^#' /etc/etcd.env | xargs -d '\n')root@node1:~# etcdctl -w table member list+------------------+---------+-------+--------------------------+--------------------------+------------+| ID | STATUS | NAME | PEER ADDRS | CLIENT ADDRS | IS LEARNER |+------------------+---------+-------+--------------------------+--------------------------+------------+| e9bba4ecf3734bea | started | etcd1 | https://10.128.0.21:2380 | https://10.128.0.21:2379 | false |+------------------+---------+-------+--------------------------+--------------------------+------------+root@node1:~# etcdctl endpoint health --cluster -w table+--------------------------+--------+-------------+-------+| ENDPOINT | HEALTH | TOOK | ERROR |+--------------------------+--------+-------------+-------+| https://10.128.0.21:2379 | true | 11.767326ms | |+--------------------------+--------+-------------+-------+root@node1:~# etcdctl endpoint status --cluster -w table+--------------------------+------------------+---------+---------+-----------+------------+-----------+------------+--------------------+--------+| ENDPOINT | ID | VERSION | DB SIZE | IS LEADER | IS LEARNER | RAFT TERM | RAFT INDEX | RAFT APPLIED INDEX | ERRORS |+--------------------------+------------------+---------+---------+-----------+------------+-----------+------------+--------------------+--------+| https://10.128.0.21:2379 | e9bba4ecf3734bea | 3.5.6 | 7.7 MB | true | false | 3 | 3348 | 3348 | |+--------------------------+------------------+---------+---------+-----------+------------+-----------+------------+--------------------+--------+root@node1:~# etcdctl check perf 59 / 60 Booooooooooooooooooooooooooooooooooooooooooooooooooooooooooooooooooooooooooooooooooooooooooooooooooooooooooooooooooooooooooooooooooooooooooooooooooooooooooooooooooooooooooooooooooooooooooooooooooooooooooooooooooooooooooom ! 98.33%PASS: Throughput is 150 writes/sPASS: Slowest request took 0.011899sPASS: Stddev is 0.000805sPASSHelm Installation on Kubernetes Node
NOTE - conduct these steps from one of the Kubernetes control plane/master nodes
Helm Install
wget https://get.helm.sh/helm-v3.11.2-linux-amd64.tar.gz
tar -zxvf helm-v3.11.2-linux-amd64.tar.gz
install linux-amd64/helm /usr/local/bin/
rm -rf helm-v3.11.2-linux-amd64.tar.gz linux-amd64
helm repo add nvdp https://nvidia.github.io/k8s-device-plugin
helm repo add akash https://akash-network.github.io/helm-charts
helm repo update
Confirmation of Helm Install
Print Helm Version
helm versionExpected Output
# helm version
version.BuildInfo{Version:"v3.11.2", GitCommit:"472c5736ab01133de504a826bd9ee12cbe4e7904", GitTreeState:"clean", GoVersion:"go1.18.10"}
Apply NVIDIA Runtime Engine
NOTE - conduct these steps on the control plane node that Helm was installed on via the previous step
Create RuntimeClass
Create the NVIDIA Runtime Config
cat > nvidia-runtime-class.yaml << EOFkind: RuntimeClassapiVersion: node.k8s.io/v1metadata: name: nvidiahandler: nvidiaEOFApply the NVIDIA Runtime Config
kubectl apply -f nvidia-runtime-class.yamlUpgrade/Install the NVIDIA Device Plug In Via Helm - GPUs on All Nodes
NOTE - in some scenarios a provider may host GPUs only on a subset of Kubernetes worker nodes. Use the instructions in this section if ALL Kubernetes worker nodes have available GPU resources. If only a subset of worker nodes host GPU resources - use the section
Upgrade/Install the NVIDIA Device Plug In Via Helm - GPUs on Subset of Nodesinstead. Only one of these two sections should be completed.
helm upgrade -i nvdp nvdp/nvidia-device-plugin \ --namespace nvidia-device-plugin \ --create-namespace \ --version 0.16.2 \ --set runtimeClassName="nvidia" \ --set deviceListStrategy=volume-mountsExpected/Example Output
root@ip-172-31-8-172:~# helm upgrade -i nvdp nvdp/nvidia-device-plugin \  --namespace nvidia-device-plugin \  --create-namespace \  --version 0.16.2 \  --set runtimeClassName="nvidia" \  --set deviceListStrategy=volume-mounts
Release "nvdp" does not exist. Installing it now.NAME: nvdpLAST DEPLOYED: Thu Apr 13 19:11:28 2023NAMESPACE: nvidia-device-pluginSTATUS: deployedREVISION: 1TEST SUITE: None
Upgrade/Install the NVIDIA Device Plug In Via Helm - GPUs on Subset of Nodes
NOTE - use the instructions in this section if only a subset of Kubernetes worker nodes have available GPU resources.
- By default, the nvidia-device-plugin DaemonSet may run on all nodes in your Kubernetes cluster. If you want to restrict its deployment to only GPU-enabled nodes, you can leverage Kubernetes node labels and selectors.
- Specifically, you can use the
allow-nvdp=true labelto limit where the DaemonSet is scheduled.
STEP 1: Label the GPU Nodes
- First, identify your GPU nodes and label them with
allow-nvdp=true. You can do this by running the following command for each GPU node - Replace
node-nameof the node you’re labeling
NOTE - if you are unsure of the
<node-name>to be used in this command - issuekubectl get nodesfrom one of your Kubernetes control plane nodes to obtain via theNAMEcolumn of this command output
kubectl label nodes <node-name> allow-nvdp=trueSTEP 2: Update Helm Chart Values
- By setting the node selector, you are ensuring that the
nvidia-device-pluginDaemonSet will only be scheduled on nodes with theallow-nvdp=truelabel.
helm upgrade -i nvdp nvdp/nvidia-device-plugin \ --namespace nvidia-device-plugin \ --create-namespace \ --version 0.16.2 \ --set runtimeClassName="nvidia" \ --set deviceListStrategy=volume-mounts \ --set-string nodeSelector.allow-nvdp="true"STEP 3: Verify
kubectl -n nvidia-device-plugin get pods -o wideExpected/Example Output
- In this example only nodes: node1, node3 and node4 have the
allow-nvdp=truelabels and that’s wherenvidia-device-pluginpods spawned at:
root@node1:~# kubectl -n nvidia-device-plugin get pods -o wide
NAME                              READY   STATUS    RESTARTS   AGE   IP            NODE    NOMINATED NODE   READINESS GATESnvdp-nvidia-device-plugin-gqnm2   1/1     Running   0          11s   10.233.75.1   node2   <none>           <none>
Verification - Applicable to all Environments
kubectl -n nvidia-device-plugin logs -l app.kubernetes.io/instance=nvdpExample/Expected Output
root@node1:~# kubectl -n nvidia-device-plugin logs -l app.kubernetes.io/instance=nvdp "sharing": { "timeSlicing": {} }}2023/04/14 14:18:27 Retreiving plugins.2023/04/14 14:18:27 Detected NVML platform: found NVML library2023/04/14 14:18:27 Detected non-Tegra platform: /sys/devices/soc0/family file not found2023/04/14 14:18:27 Starting GRPC server for 'nvidia.com/gpu'2023/04/14 14:18:27 Starting to serve 'nvidia.com/gpu' on /var/lib/kubelet/device-plugins/nvidia-gpu.sock2023/04/14 14:18:27 Registered device plugin for 'nvidia.com/gpu' with Kubelet "sharing": { "timeSlicing": {} }}2023/04/14 14:18:29 Retreiving plugins.2023/04/14 14:18:29 Detected NVML platform: found NVML library2023/04/14 14:18:29 Detected non-Tegra platform: /sys/devices/soc0/family file not found2023/04/14 14:18:29 Starting GRPC server for 'nvidia.com/gpu'2023/04/14 14:18:29 Starting to serve 'nvidia.com/gpu' on /var/lib/kubelet/device-plugins/nvidia-gpu.sock2023/04/14 14:18:29 Registered device plugin for 'nvidia.com/gpu' with KubeletTest GPUs
NOTE - conduct the steps in this section on a Kubernetes control plane node
Launch GPU Test Pod
Create the GPU Test Pod Config
cat > gpu-test-pod.yaml << EOFapiVersion: v1kind: Podmetadata: name: gpu-podspec: restartPolicy: Never runtimeClassName: nvidia containers: - name: cuda-container # Nvidia cuda compatibility https://docs.nvidia.com/deploy/cuda-compatibility/ # for nvidia 510 drivers ## image: nvcr.io/nvidia/k8s/cuda-sample:vectoradd-cuda10.2 # for nvidia 525 drivers use below image image: nvcr.io/nvidia/k8s/cuda-sample:vectoradd-cuda11.6.0 resources: limits: nvidia.com/gpu: 1 # requesting 1 GPU tolerations: - key: nvidia.com/gpu operator: Exists effect: NoScheduleEOFApply the GPU Test Pod Config
kubectl apply -f gpu-test-pod.yamlVerification of GPU Pod
kubectl logs gpu-podExpected/Example Output
root@node1:~# kubectl logs gpu-pod[Vector addition of 50000 elements]Copy input data from the host memory to the CUDA deviceCUDA kernel launch with 196 blocks of 256 threadsCopy output data from the CUDA device to the host memoryTest PASSEDDoneAkash Provider Install
NOTE - all steps in this guide should be performed from a Kubernetes control plane node
Install Akash Provider Services Binary
wget https://github.com/akash-network/provider/releases/download/v0.4.6/provider-services_0.4.6_linux_amd64.zip
unzip provider-services_0.4.6_linux_amd64.zip
install provider-services /usr/local/bin/
rm provider-services provider-services_0.4.6_linux_amd64.zip
Confirm Akash Provider Services Install
- Issue the following command to confirm successful installation of the binary:
provider-services versionExpected/Example Output
root@node1:~# provider-services versionv0.4.6Specify Provider Account Keyring Location
export AKASH_KEYRING_BACKEND=testCreate Provider Account
The wallet created in this step used will be used for the following purposes:
- Pay for provider transaction gas fees
- Pay for bid collateral which is discussed further in this section
NOTE - Make sure to create a new Akash account for the provider and do not reuse an account used for deployment purposes. Bids will not be generated from your provider if the deployment orders are created with the same key as the provider.
NOTE - capture the mnemonic phrase for the account to restore later if necessary
NOTE - in the provided syntax we are creating an account with the key name of
default
provider-services keys add defaultFund Provider Account via Faucet
Ensure that the provider account - created in the prior step - is funded. Avenues to fund an account are discussed in this document.
Export Provider Key for Build Process
STEP 1 - Export Provider Key
- Enter pass phrase when prompted
- The passphrase used will be needed in subsequent steps
cd ~provider-services keys export defaultExpected/Example Output
provider-services keys export default
Enter passphrase to encrypt the exported key:Enter keyring passphrase:-----BEGIN TENDERMINT PRIVATE KEY-----kdf: bcryptsalt: REDACTEDtype: secp256k1
REDACTED-----END TENDERMINT PRIVATE KEY-----
STEP 2 - Create key.pem and Copy Output Into File
- Copy the contents of the prior step into the
key.pemfile
NOTE - file should contain only what’s between
-----BEGIN TENDERMINT PRIVATE KEY-----and-----END TENDERMINT PRIVATE KEY-----(including theBEGINandENDlines):
vim key.pemVerification of key.pem File
cat key.pemExpected/Example File
cat key.pem-----BEGIN TENDERMINT PRIVATE KEY-----kdf: bcryptsalt: REDACTEDtype: secp256k1
REDACTED-----END TENDERMINT PRIVATE KEY-----
Provider RPC Node
Akash Providers need to run their own blockchain RPC node to remove dependence on public nodes. This is a strict requirement.
We have recently released documentation guiding thru the process of building a RPC node via Helm Charts with state sync.
Declare Relevant Environment Variables
- Update
RPC-NODE-ADDRESSwith your own value
export AKASH_CHAIN_ID=akashnet-2export AKASH_NODE=<RPC-NODE-ADDRESS>export AKASH_GAS=autoexport AKASH_GAS_PRICES=0.0025uaktexport AKASH_GAS_ADJUSTMENT=1.5- Update the following variables with your own values
- The
KEY_PASSWORDvalue should be the passphrase of used during the account export step - Further discussion of the Akash provider domain is available here
export ACCOUNT_ADDRESS=<AKASH_PROVIDER_ADDRESS>export KEY_PASSWORD=<PASSPHASE>export DOMAIN=<PROVIDER_DOMAIN>Create Provider Configuration File
- Providers must be updated with attributes in order to bid on the GPUs.
GPU Attributes Template
- GPU model template is used in the subsequent
Provider Configuration File - Multiple such entries should be included in the
Provider Configuration Fileif the providers has multiple GPU types - Currently Akash providers may only host one GPU type per worker node. But different GPU models/types may be hosted on separate Kubernetes nodes.
capabilities/gpu/vendor/<vendor name>/model/<model name>: trueExample Provider Configuration File
- In the example configuration file below the Akash Provider will advertise availability of NVIDIA GPU model A4000
- Steps included in this code block create the necessary
provider.yamlfile in the expected directory - Ensure that the attributes section is updated witih your own values
cd ~mkdir providercd providercat > provider.yaml << EOF---from: "$ACCOUNT_ADDRESS"key: "$(cat ~/key.pem | openssl base64 -A)"keysecret: "$(echo $KEY_PASSWORD | openssl base64 -A)"domain: "$DOMAIN"node: "$AKASH_NODE"withdrawalperiod: 12hattributes: - key: host value: akash - key: tier value: community - key: capabilities/gpu/vendor/nvidia/model/a4000 value: trueEOFProvider Bid Defaults
- When a provider is created the default bid engine settings are used which are used to derive pricing per workload. If desired these settings could be updated. But we would recommend initially using the default values.
- For a through discussion on customized pricing please visit this guide.
Create Provider Via Helm
export CRDS="manifests.akash.network providerhosts.akash.network providerleasedips.akash.network"kubectl delete crd $CRDS
kubectl apply -f https://raw.githubusercontent.com/akash-network/provider/v0.4.6/pkg/apis/akash.network/crd.yaml
for CRD in $CRDS; do  kubectl annotate crd $CRD helm.sh/resource-policy=keep  kubectl annotate crd $CRD meta.helm.sh/release-name=akash-provider  kubectl annotate crd $CRD meta.helm.sh/release-namespace=akash-services  kubectl label crd $CRD app.kubernetes.io/managed-by=Helmdone
helm upgrade --install akash-provider akash/provider -n akash-services -f provider.yaml \--set bidpricescript="$(cat /root/provider/price_script_generic.sh | openssl base64 -A)"
Verification
- Verify the image is correct by running this command:
kubectl -n akash-services get pod akash-provider-0 -o yaml | grep image: | uniq -cExpected/Example Output
root@node1:~/provider# kubectl -n akash-services get pod akash-provider-0 -o yaml | grep image: | uniq -c 4 image: ghcr.io/akash-network/provider:0.4.6Create Akash Hostname Operator
helm upgrade --install akash-hostname-operator akash/akash-hostname-operator -n akash-servicesVerify Health of Akash Provider
- Use the following command to verify the health of the Akash Provider and Hostname Operator pods
kubectl get pods -n akash-servicesExample/Expected Output
root@node1:~/provider# kubectl get pods -n akash-servicesNAME READY STATUS RESTARTS AGEakash-hostname-operator-5c59757fcc-kt7dl 1/1 Running 0 17sakash-provider-0 1/1 Running 0 59sIngress Controller Install
Create Upstream Ingress-Nginx Config
- Create an
ingress-nginx-custom.yamlfile
vim ingress-nginx-custom.yaml- Populate the
ingress-nginx-custom.yamlfile with the following contents:
controller: service: type: ClusterIP ingressClassResource: name: "akash-ingress-class" kind: DaemonSet hostPort: enabled: true admissionWebhooks: port: 7443 config: allow-snippet-annotations: false compute-full-forwarded-for: true proxy-buffer-size: "16k" metrics: enabled: true extraArgs: enable-ssl-passthrough: truetcp: "8443": "akash-services/akash-provider:8443"Install Upstream Ingress-Nginx
helm repo add ingress-nginx https://kubernetes.github.io/ingress-nginx
helm upgrade --install ingress-nginx ingress-nginx/ingress-nginx \  --version 4.10.1 \  --namespace ingress-nginx --create-namespace \  -f ingress-nginx-custom.yaml
Apply Necessary Labels
- Label the
ingress-nginxnamespace and theakash-ingress-classingress class
kubectl label ns ingress-nginx app.kubernetes.io/name=ingress-nginx app.kubernetes.io/instance=ingress-nginx
kubectl label ingressclass akash-ingress-class akash.network=true
Domain Name Review
Overview
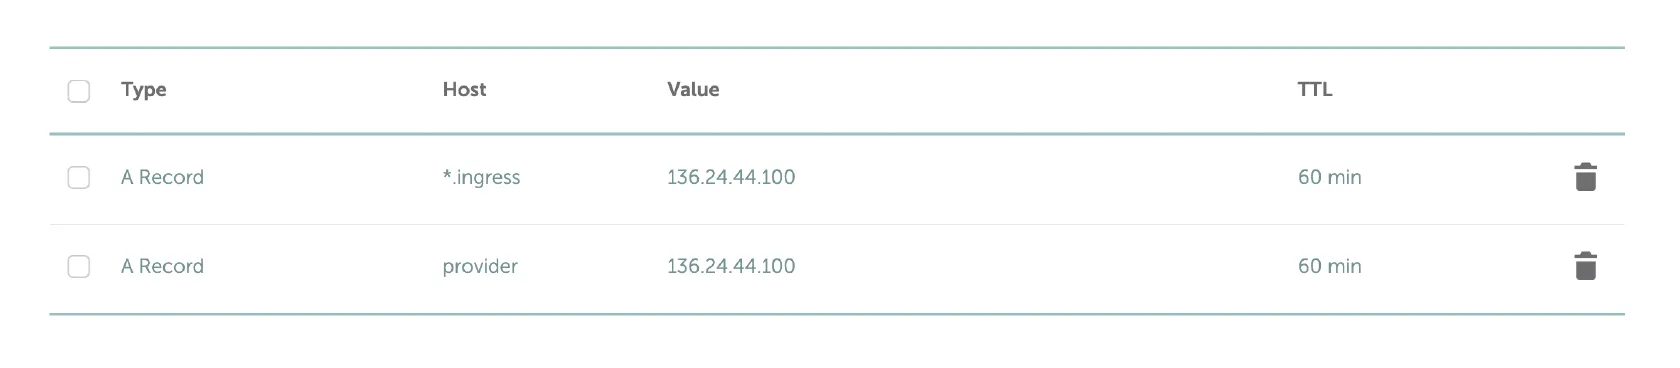
Add DNS (type A) records for your Akash Provider related domains on your DNS hosting provider.
Akash Provider Domain Records
- Replace yourdomain.com with your own domain name
- DNS (type A) records should point to public IP address of a single Kubernetes worker node of your choice
*.ingress.yourdomain.com
provider.yourdomain.com
NOTE - do not use Cloudflare or any other TLS proxy solution for your Provider DNS A records.
NOTE - Instead of the multiple DNS A records for worker nodes, consider using CNAME DNS records such as the example provided below. CNAME use allows ease of management and introduces higher availability.
*.ingress 300 IN CNAME nodes.yourdomain.com.
nodes 300 IN A x.x.x.x
nodes 300 IN A x.x.x.x
nodes 300 IN A x.x.x.x
provider 300 IN CNAME nodes.yourdomain.com.
Example DNS Configuration
GPU Test Deployments
Overview
Test your provider’s ability to host GPU related deployments via the SDLs provided in this section.
Use any of the Akash deployment tools covered here for your Provider test deployments.
NOTE - this section covers GPU specific deployment testing and verificaiton of your Akash Provider. In addition, general Provider verifications can be made via this Provider Checkup guide.
Example GPU SDL #1
NOTE - in this example the deployer is requesting bids from only Akash Providers that have available NVIDIA A4000 GPUs. Adjust accordingly for your provider testing.
---version: "2.0"
services:  gpu-test:    # Nvidia cuda compatibility https://docs.nvidia.com/deploy/cuda-compatibility/    # for nvidia 510 drivers    ## image: nvcr.io/nvidia/k8s/cuda-sample:vectoradd-cuda10.2    # for nvidia 525 drivers use below image    image: nvcr.io/nvidia/k8s/cuda-sample:vectoradd-cuda11.6.0    command:      - "sh"      - "-c"    args:      - 'sleep infinity'    expose:      - port: 3000        as: 80        to:          - global: trueprofiles:  compute:    gpu-test:      resources:        cpu:          units: 1        memory:          size: 1Gi        gpu:          units: 1          attributes:            vendor:              nvidia:                - model: a4000        storage:          - size: 512Mi  placement:    westcoast:      pricing:        gpu-test:          denom: uakt          amount: 100000deployment:  gpu-test:    westcoast:      profile: gpu-test      count: 1
Testing of Deployment/GPU Example #1
Conduct the following tests from the deployment’s shell.
Test 1
/tmp/sampleExpected/Example Output
root@gpu-test-6d4f545b6f-f95zk:/# /tmp/sample
[Vector addition of 50000 elements]Copy input data from the host memory to the CUDA deviceCUDA kernel launch with 196 blocks of 256 threadsCopy output data from the CUDA device to the host memoryTest PASSEDDone
Test 2
nvidia-smiExpected/Example Output
root@gpu-test-6d4f545b6f-f95zk:/# nvidia-smi
Fri Apr 14 09:23:33 2023+-----------------------------------------------------------------------------+| NVIDIA-SMI 525.85.12    Driver Version: 525.85.12    CUDA Version: 12.0     ||-------------------------------+----------------------+----------------------+| GPU  Name        Persistence-M| Bus-Id        Disp.A | Volatile Uncorr. ECC || Fan  Temp  Perf  Pwr:Usage/Cap|         Memory-Usage | GPU-Util  Compute M. ||                               |                      |               MIG M. ||===============================+======================+======================||   0  NVIDIA RTX A4000    Off  | 00000000:05:00.0 Off |                  Off || 41%   44C    P8    13W / 140W |      0MiB / 16376MiB |      0%      Default ||                               |                      |                  N/A |+-------------------------------+----------------------+----------------------+
+-----------------------------------------------------------------------------+| Processes:                                                                  ||  GPU   GI   CI        PID   Type   Process name                  GPU Memory ||        ID   ID                                                   Usage      ||=============================================================================||  No running processes found                                                 |+-----------------------------------------------------------------------------+root@gpu-test-6d4f545b6f-f95zk:/#
Example GPU SDL
NOTE - there is currently an issue with GPU deployments closing once their primary process completes. Due to this issue the example SDL below causes repeated container resarts. The container will restart when the stable diffusion task has completed. When this issue has been resolved, GPU containers will remain running perpetually and will not close when the primary process defined in the SDL completes.
NOTE - the CUDA version necessary for this image is
11.7currently. Check the image documentation page here for possible updates.
NOTE - in this example the deployer is requesting bids from only Akash Providers that have available NVIDIA A4000 GPUs
---version: "2.0"
services:  gpu-test:    image: ghcr.io/fboulnois/stable-diffusion-docker    expose:      - port: 3000        as: 80        to:          - global: true    cmd:      - run    args:      - 'An impressionist painting of a parakeet eating spaghetti in the desert'      - --attention-slicing      - --xformers-memory-efficient-attentionprofiles:  compute:    gpu-test:      resources:        cpu:          units: 1        memory:          size: 20Gi        gpu:          units: 1          attributes:            vendor:              nvidia:                - model: a4000        storage:          - size: 100Gi  placement:    westcoast:      pricing:        gpu-test:          denom: uakt          amount: 100000deployment:  gpu-test:    westcoast:      profile: gpu-test      count: 1